 |
The previous section described how electronic form components such as radio buttons, check boxes, and menus ensure that only valid data can be entered into a form. However, form components such as text fields allow unconstrained input. Furthermore, there may be relationships between different form elements that need to be maintained. For example, if a person has greater than zero grandchildren, that person should have at least one child.
For these reasons, it is useful to be able to enforce rules or constraints on the values that are entered into form components such as text fields.
There are two basic approaches to checking form data: client-side, where the checking is done by the web browser before the form data is submitted; and server-side, where the checking is done on a web server after the form data has been submitted.
In this section, we will look at several approaches to client-side validation of the form data. Section 5.5 contains a discussion of server-side validation.
In addition to the HTML code that describes content and structure, and the CSS code that describes layout and appearance, a web page may also contain scripts--code in a scripting language, that describes dynamic behaviour for the web page.
Within the head element of a web page, it is possible to include one or more script elements, which either contain script code or provide a reference to a separate file containing script code.
There are a number of scripting languages that can be used within web pages, but the major, cross-platform, standardised language is JavaScript.5.2
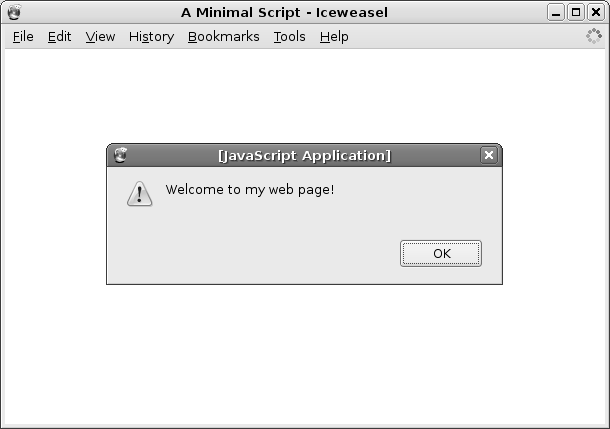
Figure 5.8 shows a minimal web page with a tiny script that pops up an annoying message when the web page is loaded. Figure 5.9 shows the result when the web page is viewed in a browser.
|
<!DOCTYPE HTML PUBLIC "-//W3C//DTD HTML 4.01 Transitional//EN">
<html>
<head>
    <title>A Minimal Script</title>
    <script type="text/ecmascript">
        alert("Welcome to my web page!")
    </script>
</head>
<body>
</body>
</html>
|
|
The script element (lines 5 to 7) has a type attribute that is used to specify which scripting language is being used. As with a style element that contains CSS code, the content of a script element is scripting code, not HTML, so the rules of syntax within a script element are completely different to the rest of the document.
A complete discussion of JavaScript is beyond the scope of this book (though we will discuss writing general-purpose scripts in a different language in Chapter 11). However, it is possible to make use of scripts without having to write them, so we will now describe some simple scripts that can be used to perform basic checking of form input.
The code in a script is run when a web page is loaded. In the example shown in Figure 5.8, the code does something immediately--it pops up a dialog box. However, it is more common for script code to define functions, which are parcels of code that will be run later, when the user interacts with the web page.
HTML form components have attributes that can be used to specify that a script function should be run when something happens to the form component. For example, there is an onfocus attribute that is run when the user interacts with a form component (e.g., when the user clicks in a text field or clicks on a radio button). Similarly, there is an onblur attribute that is run when a form control loses focus (i.e., when the user clicks somewhere else).
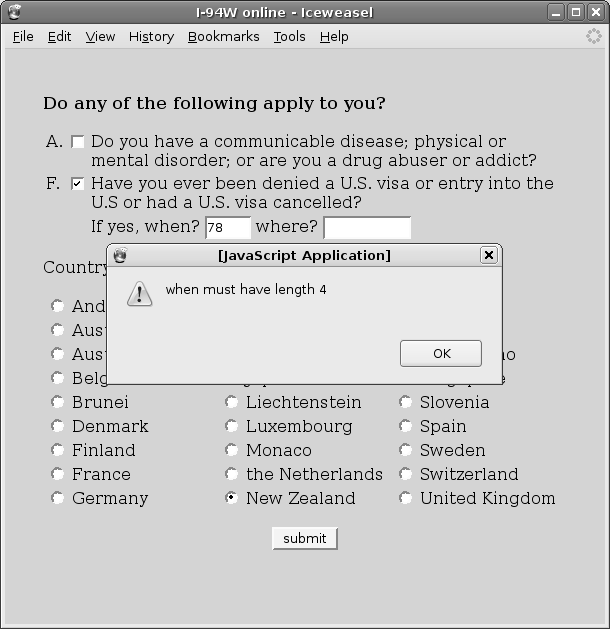
As an example, consider again the text field in the I-94W form for recording when access to the U.S. or a visa application had been denied. This was originally shown in Figure 5.5, but it is reproduced in Figure 5.10 for convenience and to show the form elements in their full context within the survey.
Suppose that we would like to limit the response to the “when?” question to be a valid year. That is, we would like the user only to be able to enter a four-digit number between 1776 (just to be safe) and 2007.
The use of an input element with type="text" and maxlength="4" could be used to restrict input to four characters. However, it would be much better if we could force the user to enter exactly four characters (no fewer), and if we could force the user to enter only digits (i.e., no letters or symbols).
We can use JavaScript to perform this additional checking via the following steps:
<script type="text/javascript" src="validate.js">
</script>
The file containing the JavaScript code, validate.js, can be downloaded from the book website5.3 and should be placed in the same directory as the file containing the HTML code.5.4
<input type="text" name="when" size="4" maxlength="4"
       onblur="hasIntegerLength(this, 4)">
If a non-number is entered, or a number with any number of digits other than four is entered, or the field is left blank, an error message will appear and the text field will be selected so that the value can be corrected. Figure 5.11 shows the error message from an invalid data entry.
This is just one example of the sort of check that we might make on an electronic form component. The JavaScript code in the file validate.js provides several other functions like this for checking the input. The full list of functions is provided in Chapter 6.
This is an important step because a form can be submitted without the user visiting all of the fields within a form. This step ensures that all fields are validated when the user attempts to submit the form.
The form element in this example now looks like this:
<form action="http://www.formbuddy.com/cgi-bin/form.pl"
      method="post" onsubmit="return(validateAll())">
If any of the validation checks fail, the form data is not submitted.
This series of steps can be used to add simple validation to an electronic form. More complex validation requires knowledge of JavaScript and/or server-side technologies (see Section 5.5 and Section 6.5).
The lack of facilities for validating input in pure HTML is one of the motivations behind more recent projects aimed at developing standard languages for describing electronic forms.
XForms is a language that is much more complex than HTML forms, but provides sophisticated facilities for constraining the input values for a form. The slider in Figure 5.7 was produced using XForms and Figure 5.12 shows the XForms code behind that web page.
|
<html xmlns="http://www.w3.org/1999/xhtml"
      xmlns:xf="http://www.w3.org/2002/xforms"
      xmlns:xs="http://www.w3.org/2001/XMLSchema">
  <head>
    <style>
        body { background-color: #9CF2CA;
               padding-top: 20px;
               padding-left: 5%; padding-right: 5%; }
    </style>
    <xf:model>
      <xf:instance>
        <root xmlns="">
          <role>4</role>
        </root>
      </xf:instance>
      <xf:bind nodeset="role" type="xs:decimal"/>
    </xf:model>
  </head>
  <body>
      <p>
      How would you describe your role in society?
      </p>

      <p>
      career criminal
      <xf:range ref="role"
                start="1" end="7" step=".5">
          <xf:label />
      </xf:range>
      model citizen
      </p>
  </body>
</html>
|
Much of this code should be familiar; a lot of it is standard HTML elements. The differences are the use of the range element (lines 26 to 29), which generates the slider on screen, and the model element (lines 10 to 17), which specifies how the form data is structured and what type of input each form component can enter (in this case, the slider records a decimal value).
XForms is a very powerful language that allows for very precise control over the data that is recorded by an electronic form, however, it quickly becomes quite complex.
Another electronic form technology that is being developed is Web Forms 2. This is a less radical departure from HTML forms and mostly just extends the standard with new elements to allow for other input components (e.g., sliders, dates, ...) and new attributes to allow more constraints to be applied to the input data (e.g., ranges of values).
Figure 5.13 shows Web Forms 2 code for a slider like that in Figure 5.7 and the resulting web page is shown in Figure 5.14. The Web Forms 2 code is much more like regular HTML code, with the slider generated by an input element with type="range" (line 18).
|
<!DOCTYPE HTML PUBLIC "-//W3C//DTD HTML 4.01 Transitional//EN">
<html>
  <head>
    <title>Web Forms 2 Slider</title>
    <style>
        body { background-color: #9CF2CA;
               padding-top: 20px;
               padding-left: 5%; padding-right: 5%; }
    </style>
  </head>
  <body>
      <p>
      How would you describe your role in society?
      </p>

      <p>
      career criminal
          <input type="range" value="4" min="1" max="7" step=".5">
      model citizen
      </p>
  </body>
</html>
|

|
The major problem with these newer technologies is that there is less software available to support them. A number of programs implement XForms, including an add-on for the Firefox browser, and the Opera web browser has started an implementation of Web Forms 2, but these programs are either incomplete or not widely available.
Paul Murrell

This document is licensed under a Creative Commons Attribution-Noncommercial-Share Alike 3.0 License.