 |
Consider the correct version of the english sentence we saw in Section 2.3:
The chicken is too hot to eat!
This now has correct syntax, which means that there are no spelling errors or grammatical errors, which means that we should be able to successfully extract the meaning from the sentence. When we write code in a computer language, we call the meaning of the code--what the computer will do when the code is run--the semantics of the code. Computer code has no defined semantics until it has a correct syntax, so we should always check that our code is free of errors before worrying about whether it does what we want.
Look again at the english sentence; what does the sentence mean? One reading of the sentence suggests that a person has burnt his or her mouth with a piece of cooked chicken. However, there is another possible meaning; perhaps a chicken has lost its appetite because it has been out in the sun too long! One problem with human languages is that they tend to be very ambiguous.
Computer languages, by comparison, tend to be very precise, so as long as we get the syntax right, there should be a clear semantics for the code. This is important because it means that we can expect our code to produce the same result on different computers and even with different software.
The HTML 4.01 specification defines a fixed set of valid HTML elements and describes the meaning of each of those elements in terms of how they should be used to create a web page.
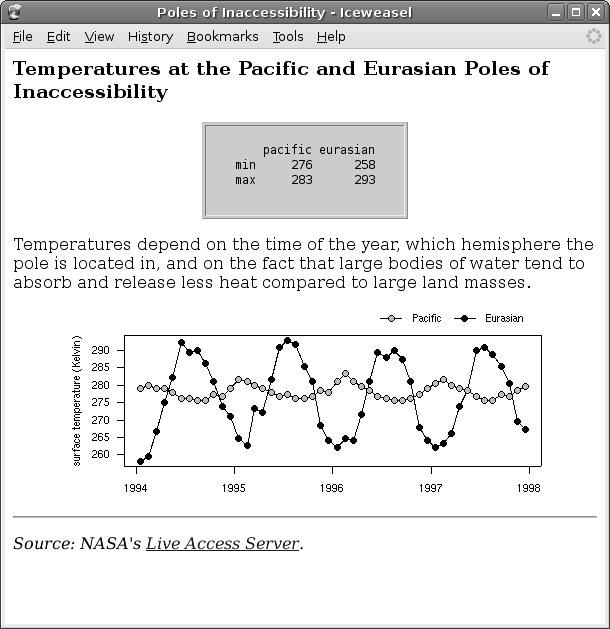
In this section, we will use the simple HTML page shown at the start of this chapter to demonstrate some of the basic HTML elements. Chapter 3 provides a larger list. Figure 2.8 and Figure 2.9 are reproductions of Figures 2.1 (what the web page looks like) and 2.2 (the HTML code) for convenient reference.
|
|
<!DOCTYPE HTML PUBLIC "-//W3C//DTD HTML 4.01 Transitional//EN">
<html>
    <head>
        <title>Poles of Inaccessibility</title>
    </head>
    <body>
        <h3>
        Temperatures at the Pacific and Eurasian Poles of
        Inaccessibility
        </h3>

        <center>
        <table border="1" bgcolor="#CCCCCC">
            <tr>
                <td>
                <pre>

        pacific eurasian
    min     276      258
    max     283      293
                </pre>
                </td>
            </tr>
        </table>
        </center>

        <p>
        Temperatures depend on the time of the year, which
        hemisphere the pole is located in, and on the fact
        that large bodies of water tend to absorb and release
        less heat compared to large land masses.
        </p>

        <center><img src="poleplot.png"></center>

        <hr>
        <p>
        <i>
        Source:  NASA's
        <a href="http://mynasadata.larc.nasa.gov/LASintro.html">
        Live Access Server</a>.
        </i>
        </p>
    </body>
</html>
|
The main part of the HTML code in Figure 2.9 is contained within the body element (lines 6 to 44). This is the content of the web page; the information that will be displayed by the web browser.2.5
The first element we encounter within the body is an h3 element (lines 7 to 10). The contents of this element provide a title for the page, which is indicated by drawing the relevant text bigger and bolder than normal text. There are several such heading elements in HTML, from h1 to h6, where the number indicates the heading “level”, with 1 being the top level (biggest and boldest) and 6 the lowermost level. Note that this element does two things: it describes the structure of the information in the web page and it controls the appearance for the information--how the text should be displayed. The structure of the document is what we should focus on; we will discuss the appearance of the web page in more depth in Section 2.11.1.
The next element in our code is a center element (lines 12 to 25). This only controls the appearance of its content, ensuring that the table within this element is horizontally centred.
Next up is the table element (lines 13 to 24). Within a table element, there must be a tr (table row) element for each row of the table, and within each tr, there must be a td (table data) element for each column of the table. In this case, the table consists of a single row (lines 14 to 23) and a single column (lines 15 to 22). The border attribute of the table element specifies that a border should be drawn around the outside of the table and the bgcolor attribute specifies a light grey background for the table.
The content of the table is a pre (preformatted text) element (lines 16 to 21). This element is used to display text exactly as it is entered, using a monospace font, with all spaces faithfully reproduced. The point of this will become clear when we discuss the p element below.
The widths of the columns in an HTML table are automatically determined by the web browser to allow enough space for the contents of the table.
The next element in our code is a p (paragraph) element (lines 27 to 32). The important thing to notice about this element is that the contents are not displayed as they appear in the code (compare the line breaks in the HTML code within the p element in Figure 2.9 with the line breaks in the corresponding paragraph of text in Figure 2.8). The p tags indicate that the contents should be arranged as a paragraph of text.
After the paragraph, we have another center element which ensures the horizontal centering of the plot. The plot is generated by the img (image) element (line 34). The src attribute of the img element specifies the location of the file for the image.
At the bottom of the page we have an hr (horizontal rule) element (line 36), which produces a horizontal line across the page, followed by a final paragraph (p element) of text (lines 37 to 43). The text within this paragraph is italicized because it is contained within an i element (lines 38 to 42).
Part of the text in the final paragraph is also a hyperlink. The a (anchor) element around the text “Live Access Server” (lines 40 and 41) means that this text is highlighted and underlined. The href attribute specifies that when the text is clicked, the browser will navigate to the home page of NASA's Live Access Server.
These are some of the simple HTML elements that can be used to create web pages. There are many more elements that can be used to create a variety of different effects (Chapter 3 describes a few more and we will meet some special, interactive HTML elements in Chapter 5), but the basic pattern is the same: the code consists of HTML tags surrounding the important information that is to be displayed.
Paul Murrell

This document is licensed under a Creative Commons Attribution-Noncommercial-Share Alike 3.0 License.