 |
One of the purposes of this book is to introduce and explain various technologies for working with data. We have already met one such technology, HTML, for producing reports on the world-wide web.
Another purpose of this book is to promote the correct approach, or “best practice”, for using these technologies. An example of this is the emphasis on writing code using computer languages rather than learning to use dialog boxes and menus in a software application.
In this section, we will look at another example of best practice called the DRY principle,2.7 which has important implications for how we manage the code that we write.
DRY stands for Don't Repeat Yourself and the principle is that there should only ever be one copy of any important piece of information.
The reason for this principle is that one copy is much easier to maintain than multiple copies; if the information needs to be changed, there is only one place to change it. In this way the principle promotes efficiency. Furthermore, if we lapse and allow several copies of a piece of information, then it is possible for the copies to diverge or for one copy to get out of date. Having only one copy improves our accuracy.
To understand the DRY principle, consider what happens when we move house to a new address. One of the many inconveniences of shifting house involves letting everyone know our new address. We have to alert schools, banks, insurance companies, doctors, friends, etc. The DRY principle suggests that we should have only one copy of our address stored somewhere (e.g., at the post office) and everyone else should refer to that address. That way, if we shift house, we only have to tell the post office the new address and everyone will see the change. In the current situation, where there are multiple copies of our address, it is easy for us to forget to update one of the copies when we change address. For example, we might forget to tell the bank, so all our bank correspondence will be sent to the wrong address!
The DRY principle will be very important when we discuss the storage of data (Chapter 7), but it can also be applied to computer code that we write. In the next section, we will look at one example of applying the DRY principle to writing computer code.
Cascading Style Sheets (CSS) is a language that is used to describe how to display information. It is commonly used with HTML to control the appearance of a web page. In fact, the preferred way to produce a web page is to use HTML to indicate the structure of the information and CSS to specify the appearance. One of the reasons that this is preferred is due to the DRY principle.
CSS code consists of a series of rules and each rule comprises a selector and a set of properties. The selector specifies what sort of HTML element the rule applies to and the properties specify how that element should be displayed. An example of a CSS rule is shown below.
table {
    border-width: thin;
    border-style: solid;
}
In this rule, the selector is table so this rule will apply to all HTML table elements.
There are two properties in this rule, both relating to the border that is drawn around the table. The properties specify that a thin, solid border should be drawn around tables.
CSS is a completely separate language from HTML, but the rules in CSS code can be combined with HTML to control the appearance of a web page.
CSS code can be associated with HTML code in several ways, but the best way is to create a separate file for the CSS code. In this way, a web page consists of two files: one file contains the main content with HTML code to specify the structure and another file contains the CSS code to specify the appearance. The HTML file is linked to the CSS file via a special element in the HTML code.
To demonstrate the combination of CSS and HTML code, and to describe more about CSS rules, we will reproduce the web page from the start of this chapter using CSS.
Figure 2.10 shows HTML code for a simple statistical report. This is very similar code to that in Figure 2.2, but several attributes have been removed and others have been added. For example, the table element used to have attributes controlling its appearance (this code is from line 13 in Figure 2.2):
|
<!DOCTYPE HTML PUBLIC "-//W3C//DTD HTML 4.01 Transitional//EN">
<html>
<head>
<title>Poles of Inaccessibility</title>
<!-- The appearance of the web page is controlled by
CSS code rather than by HTML attributes -->
<link rel="stylesheet" href="csscode.css"
type="text/css">
</head>
<body>
<h3>
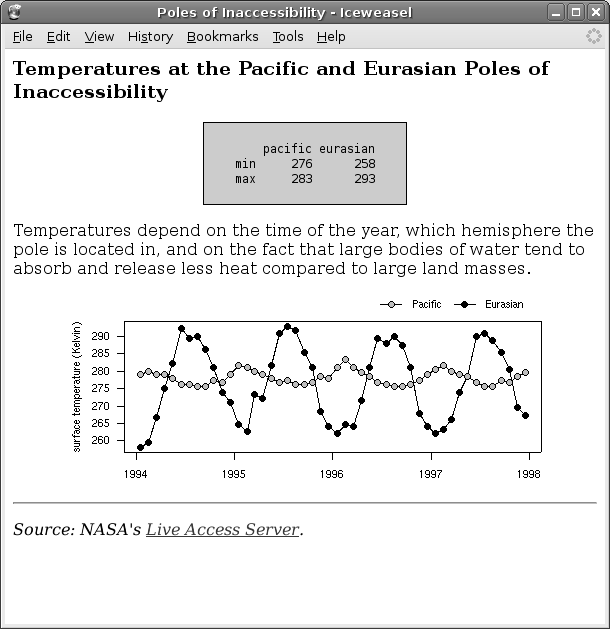
Temperatures at the Pacific and Eurasian Poles of
Inaccessibility
</h3>
<table class="figure">
<tr>
<td>
pacific eurasian
min 276 258
max 283 293
</td>
</tr>
</table>
<p>
Temperatures depend on the time of the year, which
hemisphere the pole is located in, and on the fact
that large bodies of water tend to absorb and release
less heat compared to large land masses.
</p>
<img class="figure" src="poleplot.png">
<hr>
<p class="footer">
Source: NASA's
<a href="http://mynasadata.larc.nasa.gov/LASintro.html">
Live Access Server</a>.
</p>
</body>
</html>
|
<table border="1" bgcolor="#CCCCCC">
Now, the table element has only a class attribute (this code is from line 18 in Figure 2.10):
<table class="figure">
We will see an explanation of the class attribute soon.
The most important difference in the HTML code is the addition of a link element within the head element (lines 9 and 10 in Figure 2.10). The relevant line is this:
<link rel="stylesheet" href="csscode.css" type="text/css">
This piece of HTML code specifies that there is a file called csscode.css that contains CSS rules and that those rules should be applied to the HTML elements in this (HTML) file. The contents of the file csscode.css are shown in Figure 2.11.
|
table {
    background-color: #CCCCCC;
    border-width: thin;
    border-style: solid;
    white-space: pre;
    font-family: monospace;
}

.figure {
    margin-left: auto;
    margin-right: auto;
}

img {
    display: block;
}

p.footer {
    font-style: italic;
}
|
There are several rules in the CSS code and they demonstrate several different ways of specifying CSS rule selectors as well as several different CSS properties.
The first rule is this:
table {
    background-color: #CCCCCC;
    border-width: thin;
    border-style: solid;
    white-space: pre;
    font-family: monospace;
}
This rule has a simple selector, table, so it will apply to all table elements. The first three properties specify that the background colour for the table should be a light grey and that there should be a thin, solid border.2.8 The last two properties control the appearance of the text within the table and specify that a monospace font should be used and that the text should be displayed exactly as it appears in the HTML code (in particular, all spaces should be displayed).
The second rule demonstrates a different sort of CSS rule selector, called a class selector:
.figure {
    margin-left: auto;
    margin-right: auto;
}
The . (full stop) at the start of the selector name is important. It indicates that what follows is the name of a CSS class. This rule will be applied to any HTML element that has a class attribute with the value "figure". Looking at the HTML code in Figure 2.10, we can see that this rule will apply to both the table element and the img element (both of these elements have attributes class="figure"; see lines 18 and 35).
The properties in this second CSS rule are also a little more complicated. These control the margins (empty space) to the left and right of the relevant HTML element. By specifying auto margins we are letting these margins grow to be as large as they can, but still leave enough room for the HTML element. This is how we can centre an HTML element on the page using CSS.
The third CSS rule again has a straightforward selector, img. This rule will apply to all img elements. The CSS property display: block makes the img element behave like a paragraph of its own,2.9 which is necessary to make the previous rule centre the image.
img {
    display: block;
}
The final rule controls the formatting of the source comment at the bottom of the web page:
p.footer {
    font-style: italic;
}
The selector in this case combines both an HTML element name and a CSS class name. This rule will affect all p elements that have a class attribute with the value "footer". The effect of this rule is to make the text italic, but only in the p element at the bottom of the HTML code (lines 38 to 42). This rule does not affect the other p element within the HTML code (lines 28 to 33).
The final result of this combination of HTML and CSS code is shown in Figure 2.12.
The only difference in the appearance between Figure 2.12 and Figure 2.1 is the border around the numeric results, but the underlying code is quite different.
|
The point of this example, other than to introduce another simple computer language, CSS, that provides the “correct” way to control the appearance of web pages, is to show the DRY principle in action.
There are two ways that the use of CSS demonstrates the DRY principle. First of all, if we want to produce another HTML report and we want that report to have the same appearance as the report we have just produced, we can simply make use of the same CSS code to control the appearance of the new report. In other words, with CSS, we can have a single copy of the code that controls the web page appearance and this code can be reused for different web page content.
The alternative would be to include HTML attributes in both the original report and the new report to control the appearance. That would involve typing more code and, more importantly, it would mean more than one copy of the important information about the appearance of the web pages. If we wanted to change the appearance of the reports, we would have to change both reports. With a single CSS file, any changes in the appearance only need to be made to the CSS file and that will update both reports.
Another advantage of using CSS code can be seen if we want to produce the same report in two different styles. For example, we might produce one version for people to view on a screen and a different version for people to print out.
The wrong way to create two different versions of the web page would be to have two copies of the HTML code, with different appearance information in each one. That approach would violate the DRY principle. What we want is to only have one copy of the HTML code.
This is possible using CSS. We can have two separate CSS files, each containing different rules, and swap between them to produce different views of the same HTML code. We will develop a new set of CSS rules in a file called csscode2.css. Then all we have to do is change the link element in the HTML code to refer to this new CSS code. The new line of HTML code looks like this:
<link rel="stylesheet" href="csscode2.css" type="text/css">
Figure 2.13 shows the result we will end up with. This should be compared with Figure 2.12, which is the same HTML code, just with different CSS code controlling the appearance.
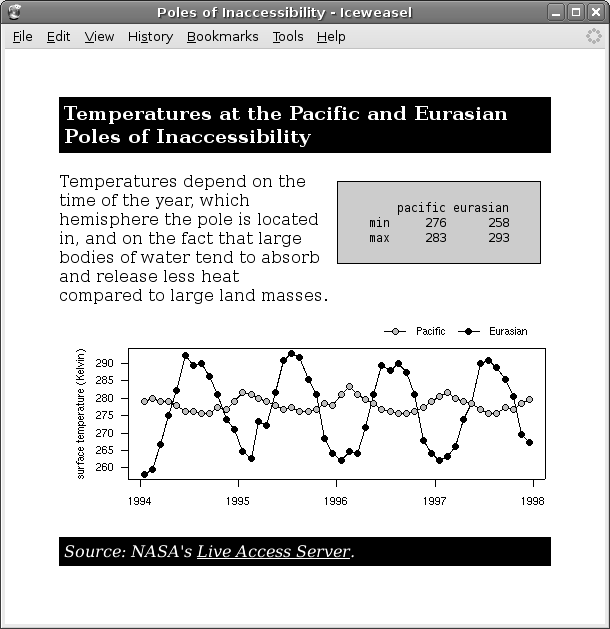 |
Figure 2.14 shows the file containing the new set of CSS rules (compare these with the CSS rules in Figure 2.11).
|
body {
    margin-top: 8%;
    margin-left: 9%;
    margin-right: 9%;
}

h3, p.footer {
    background-color: black;
    color: white;
    padding: 5px;
}

table {
    float: right;
    margin: 2%;
    background-color: #CCCCCC;
    border-width: thin;
    border-style: solid;
    white-space: pre;
    font-family: monospace;
}

img {
    display: block;
    margin-left: auto;
    margin-right: auto;
}

hr {
    display: none;
}

/* Anchors are blue by default which is not
   very visible on a black background */
a {
    color: white;
}

p.footer {
    font-style: italic;
}
|
In this new CSS code, there is a new rule for the body element to produce margins around the whole page (lines 1 to 5). There is also a new rule for the hr element that means that the horizontal line is not drawn at all (display: none; lines 29 to 31) and one for the a element so that it is drawn in white (lines 35 to 37). Another significant change is the new property for table elements, so that the numeric results “floats” to the right of the page, with the text wrapped around it to the left (line 14).
The new CSS code also demonstrates another type of CSS selector:
h3, p.footer {
    background-color: black;
    color: white;
    padding: 5px;
}
The selector for this rule specifies a group of elements. This rule is applied to all h3 elements and to all p elements that have a class attribute with the value "footer". This is the rule that displays the heading and the source information in white text on a black background.
The code also demonstrates how to write comments in CSS. Lines 33 and 34are a CSS comment:
/* Anchors are blue by default which is not
   very visible on a black background */
In CSS, a comment is anything enclosed between an opening /* and a closing */.
Paul Murrell

This document is licensed under a Creative Commons Attribution-Noncommercial-Share Alike 3.0 License.